How I Create My Character Designs
- Patricia

- Jan 7, 2022
- 3 min read

The fine folks over at Kugali Media are hosting a competition for illustrators to create characters that fit into their comic book universe. The challenge sounded like fun to me so I decided to use it to explain the ins and outs of my character design process.
Step 1: Research!
The first thing that I did was familiarize myself with the Kugali Universe by reading some of their published books. They offer some free comic books on their website and I decided to start with Nani Volume 1, a story about two sisters who are transported to a strange mystical world they must escape.
Reading this and their other free comics showed me how important myths and folktales are to the Kugali Universe. I used that bit of insight to inform how I created my character.
Step 2: Brain Dump!
Before I start drawing, I write down my ideas. My brain is swimming with them at this point, so this helps me to keep track of the ideas.
Some of the ideas that I came up with for this challenge
an Ancient shapeshifter with the power to heal
a boy hero raised by a mythical species of birds called the Inkukti. He wears a magical feathered cloak that helps him to leap from one faraway forest branch to another. He was also born with enhanced agility and strength.
a brawny innkeeper manning a waterhole near the portal between life and death.
Out of these three, the second one appealed to me the most because I like the idea of incorporating a bird headdress into the design, so I went with that one
Step 3: Sketch!
Before I started drawing, I looked up some references for bird masks on Pinterest because I wanted to get a sense of how it would sit on his head. As for the shape language, I knew that I wanted to give him gracefully elongated limbs to emphasize his agility. For his face, I wanted the shapes I used to have sharp points as that also illustrates his similarity to birds.
In the video below, you'll see me try out a bunch of poses, some more successful than others. I really vibed with the first one, though, so I went on to colour it in Krita.
Step 4: Render!
I knew that I wanted my "bird boy" to be colorful so I searched Pinterest again for references and chose these pictures of macaws to be my color guides.


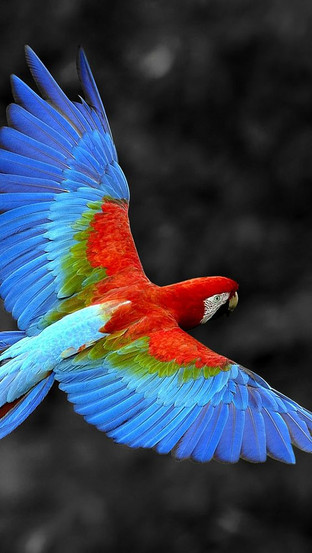


When I color, I like to create zones of warm and cool hues. I this case I kept the warm yellows and reds near his face and the cooler blues and purples around his body. I originally wanted the background to be a blue sky but I realized that it would clash too much with the feathers so I switched to more of a "dawn" color scheme with soft orange and lavender hues.
Helpful Tools And Resources:
I hope this little insight into my character design process was helpful to you. if you're interested in learning more, you can check out some of the resources below that. I've used all of these in the past and I think they're great!
Classes: Character Design With Aaron Blaise - An in-depth course taught by a former Walt Disney animator
Videos: Top 5 Tips For Character Design - Ross Draws, Character Concepting Process - Loose Sketch to Final Painting w Dave Greco
Happy Character Designing!
xoxo
Patricia


Comments